
BMWKLUB.SK
... všetko o BMW ...
FAQ - Výměna membrány PCV u motorů N51,N52 a N53
Zdroj: http://vanos-bmw.com/membrane-for-cover ... 1127552281
Z důvodu zachování autenticity ponechávám v angličtině, jazykově nepolíbení použijí "translator".
Membrane for cover N51, N52, N52N, N52K, N53 BMW 11127552281 ( 11127548196 ) — 1 pcs. — $28.90, savings of more than $450.
New diaphragm valve for crankcase ventilation. Producer sells only cover entirely. We produce membrane separately!
For replacement you need to remove the valve cover by prying it with a screwdriver. Be careful, remove the cover of the membrane slowly.
remove the old and install the new membrane. Close the cover.
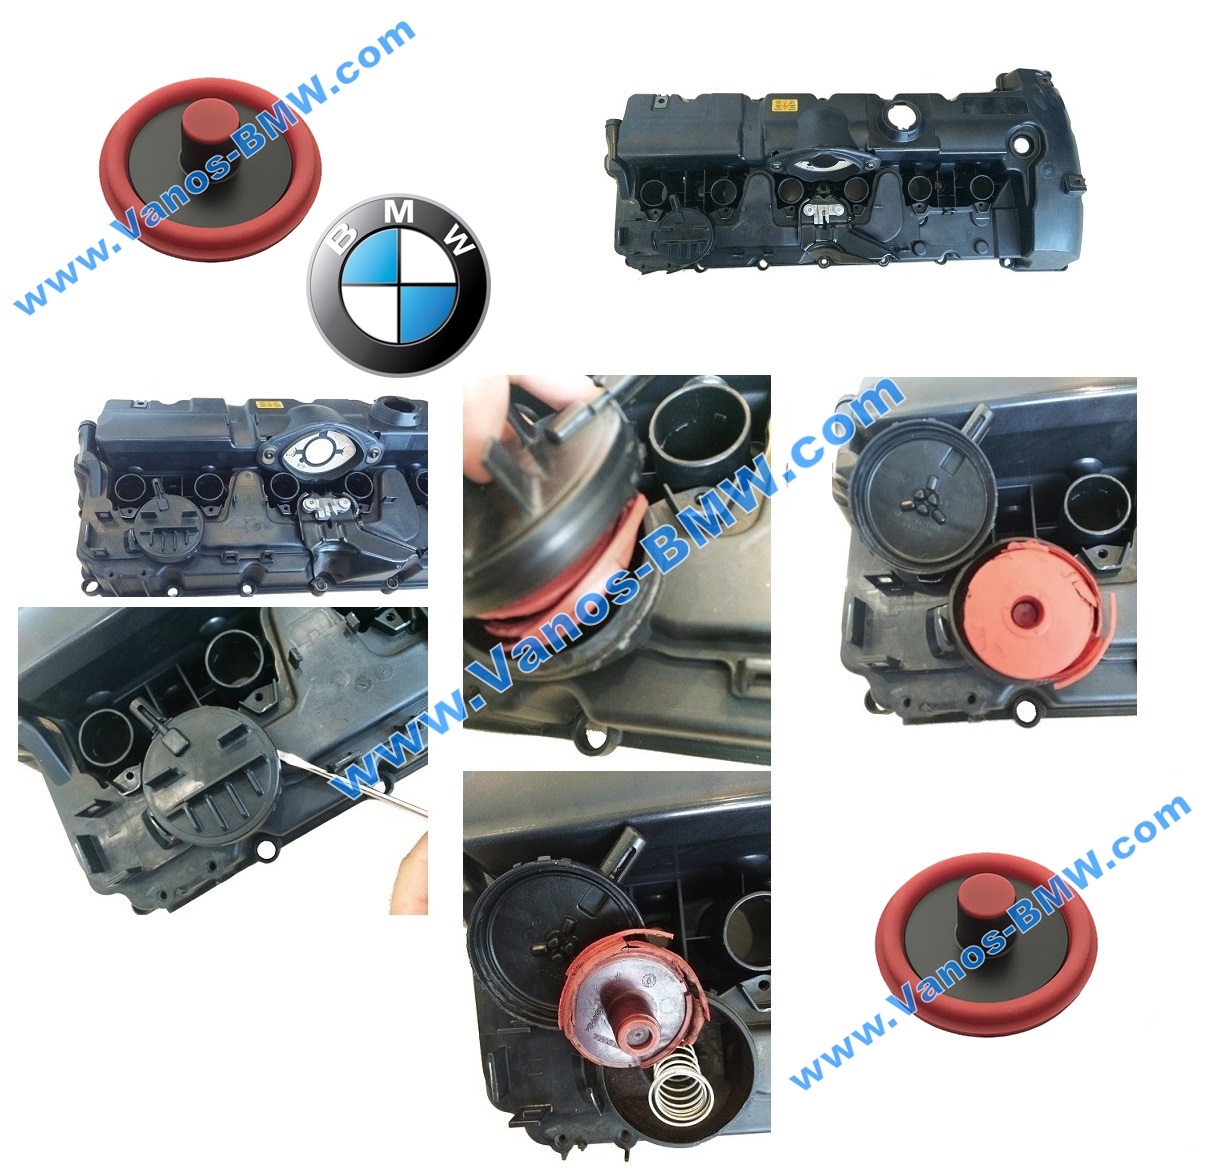
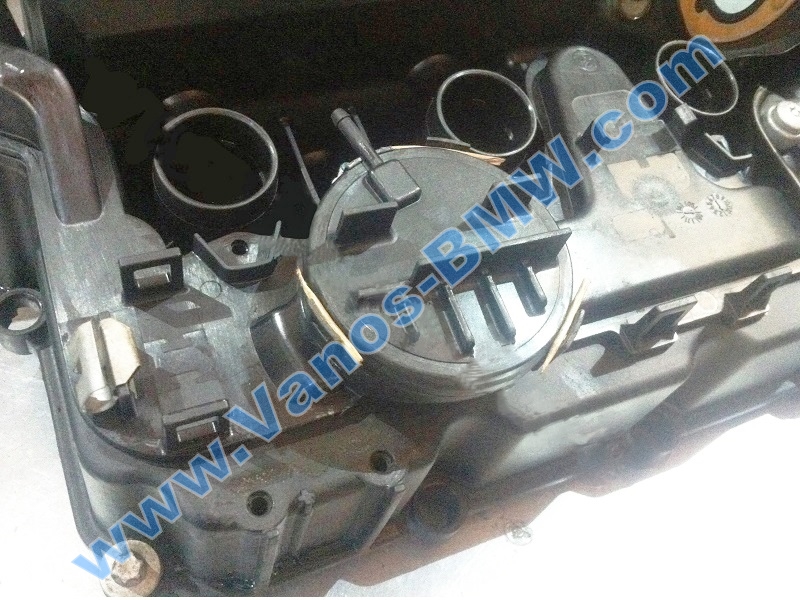
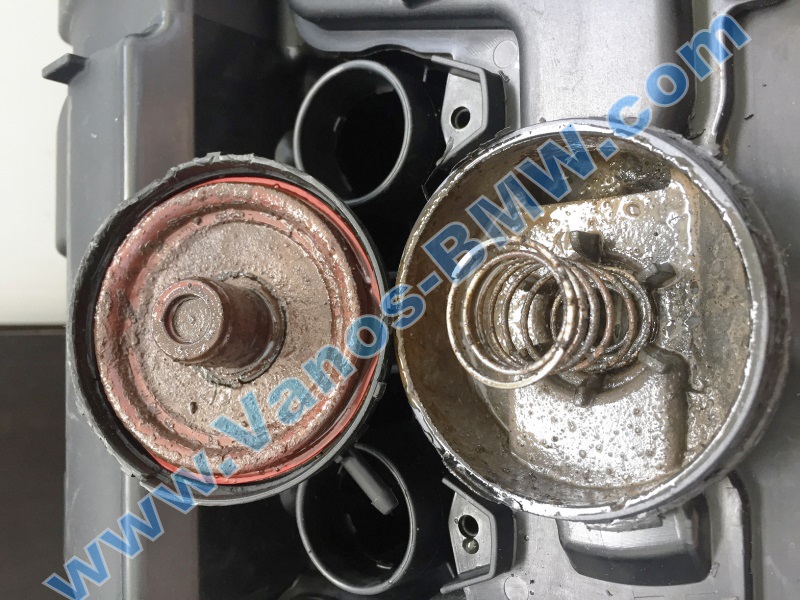
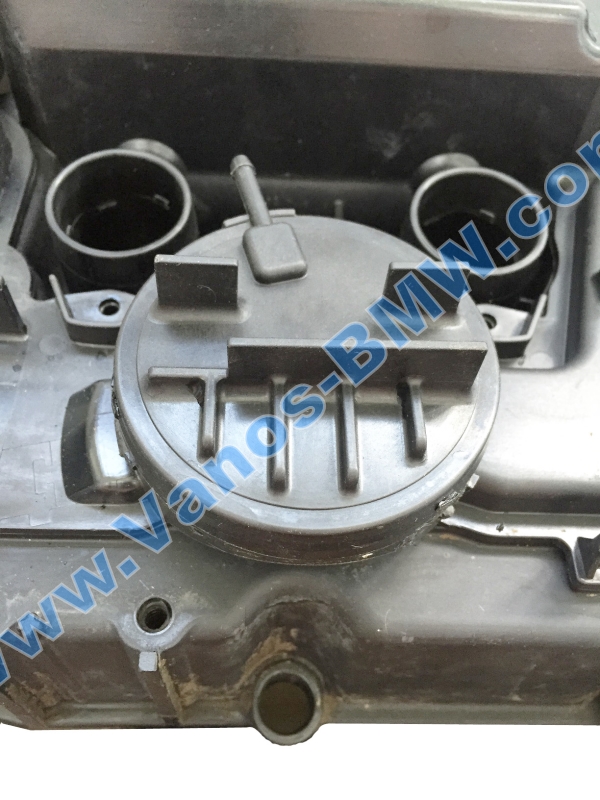
Over time, the membrane crankcase ventilation valve mounted inside the valve cover N51, N52, N52N, N52K, N53 (valve is integrated in the motor)
11127552281, 11127548196 dries and breaks. Through the torn membrane into the engine gets unaccounted mass air flow sensor.
As a result, the engine can be difficult to start, unstable work (especially at idle), smoke may be misfiring, as the engine can get the dust,
which enhances the wear of parts and mechanisms.If the whistle is heard in the area of ??finding oil separator, then the membrane is torn.
The manufacturer sells only the valve cover assembly cost, which is about $ 500. We produce and sell this membrane separately.
Check the membrane is torn or not kvkg valve can be as follows:
It is necessary to put the tube on the breather valve and try to blow membrane (draw and exhale into a tube air),
if the membrane is torn the valve will be «purged» if the entire membrane valve will not be purged.
http://vanos-bmw.com/images/n52/002.jpg
Replacement instructions:
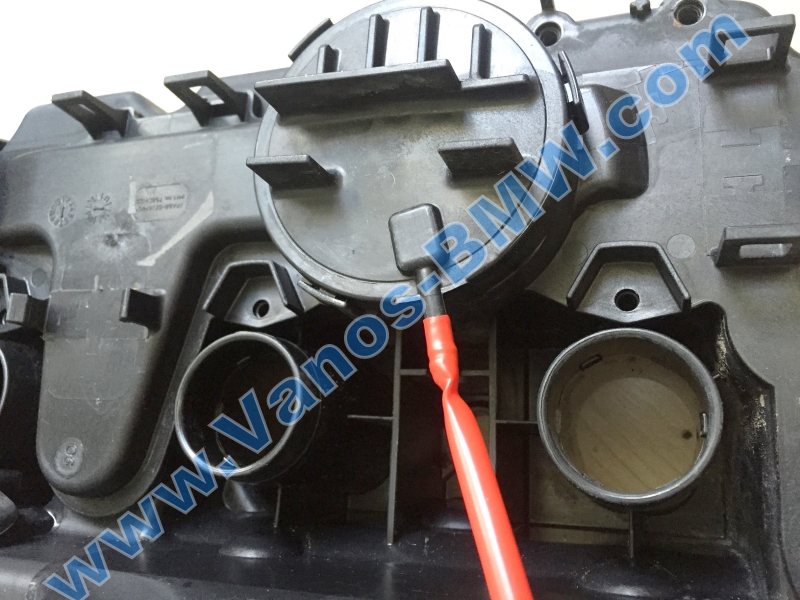
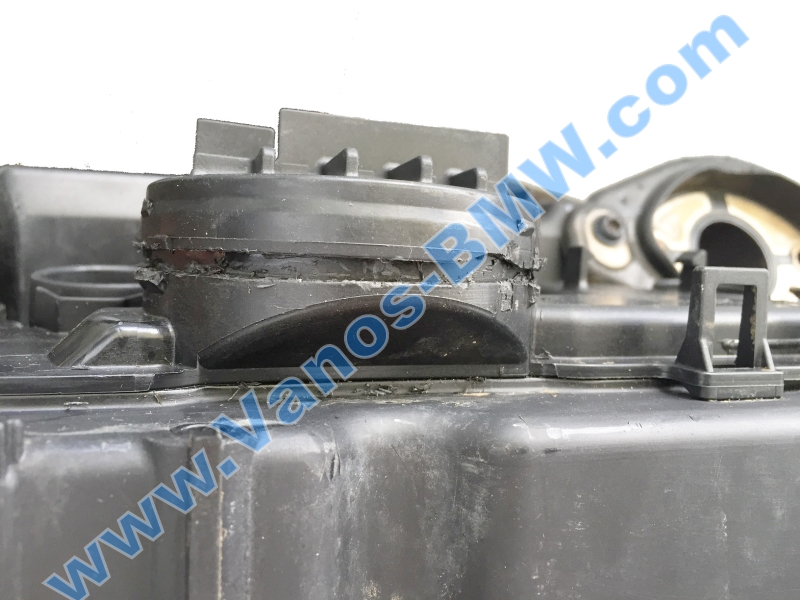
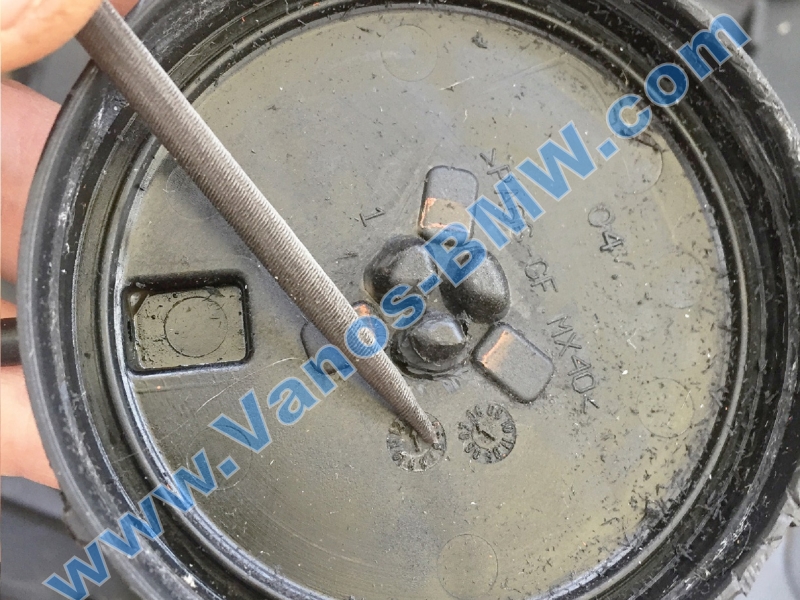
Remove the valve cover. (you can replace the lid not removed, but it is not very convenient).
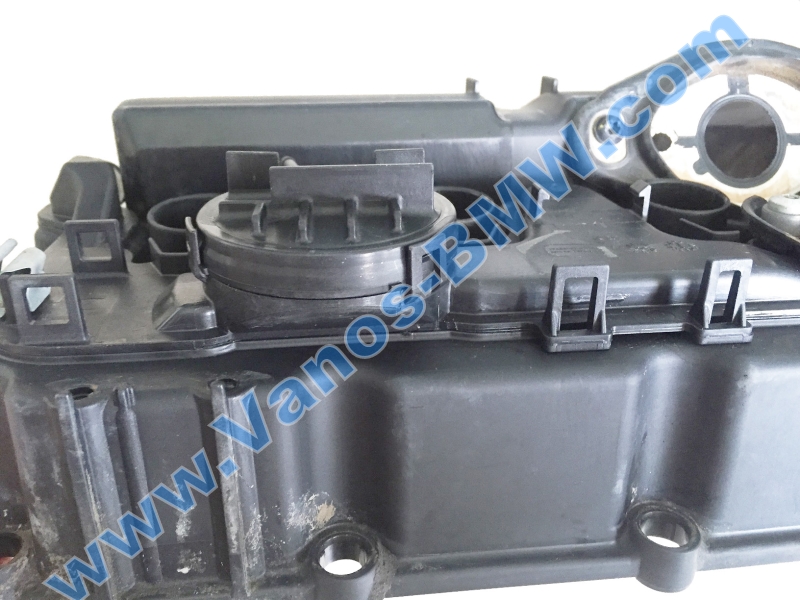
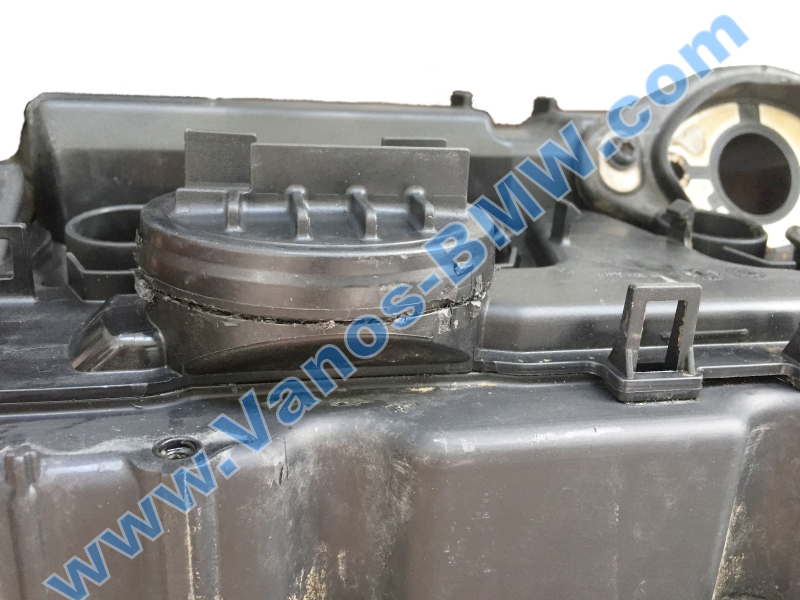
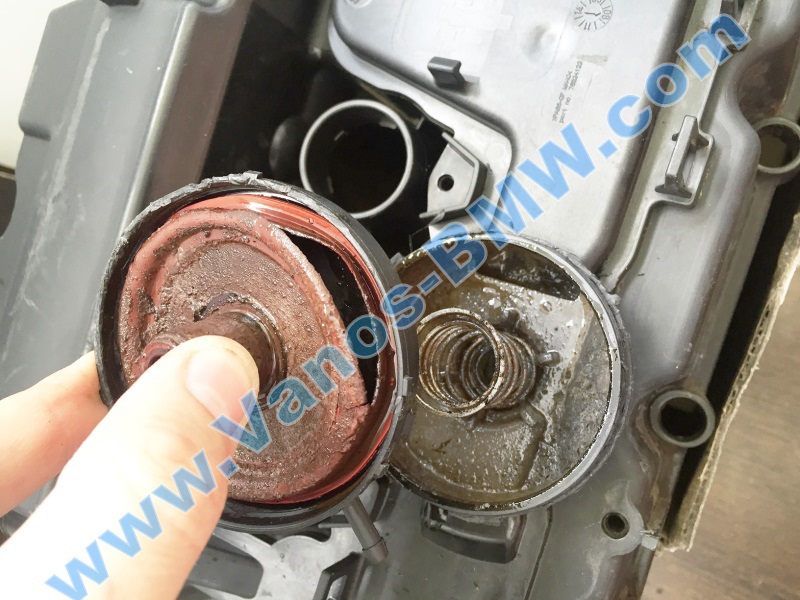
Remove the cover of the membrane. (The cover is glued to the membrane plant in one or two places, but still cover can be removed).
http://vanos-bmw.com/images/n52/003.jpg
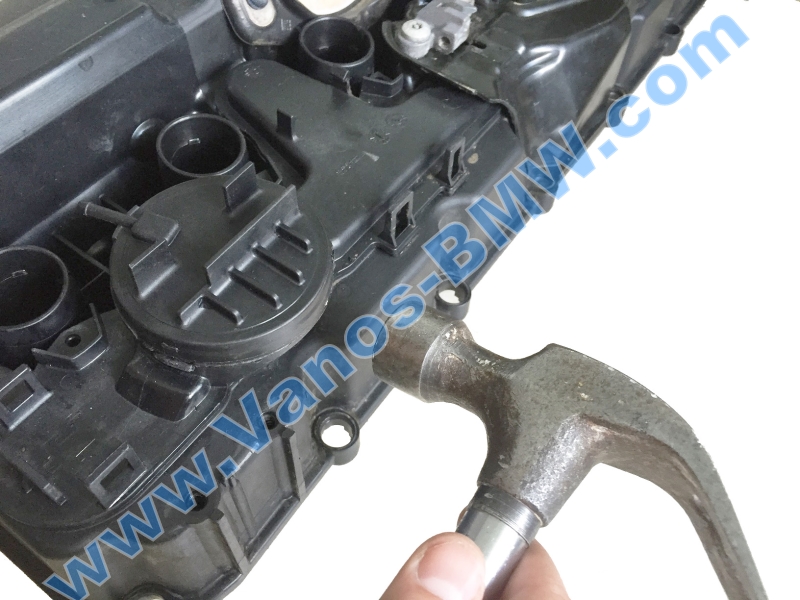
In order to remove the cover, take a small hammer and gently knock the cover membrane. (due to the nature of the adhesive after drying it is fragile,
brittle when rapping glue cracked and softer plastic is not).
http://vanos-bmw.com/images/n52/004.jpg
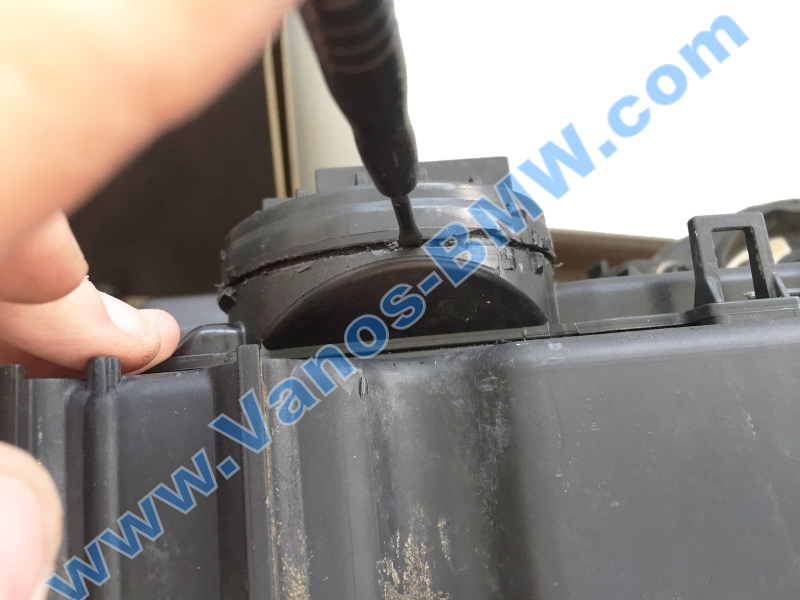
In order to remove the cover of the membrane without breaking the retaining clips, they need to heat the building hairdryer.
In the heated lid turn down the retaining bracket and between them and puts a lid membrane such as a toothpick.
http://vanos-bmw.com/images/n52/005+.jpg
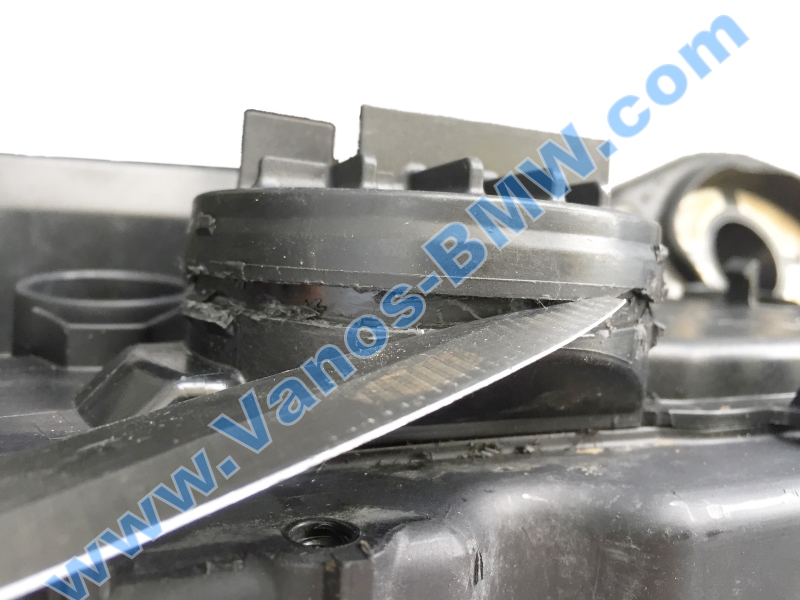
Now, the cover can be removed, but we must remember that the cover is stuck in a circle.
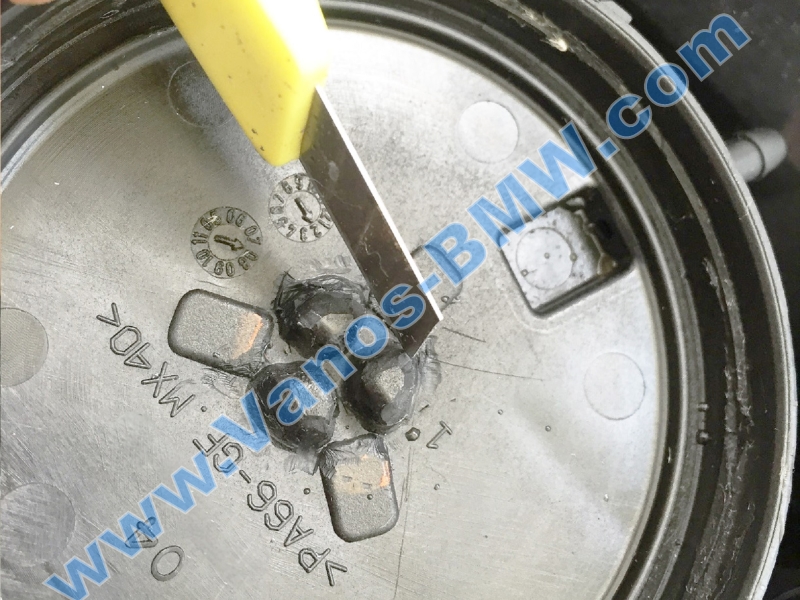
Once again heated lid of the membrane and into the gap between the neck and the cover insert a flathead screwdriver, but do not break out the cover,
but simply trying to expand the gap a little (we put a screwdriver into the slot and hitting it with a hammer, it is convenient to use a screwdriver
instead of a dull knife sticking his plane) (clicks will be heard cracking glue). If the lid fell on one side akuratno we continue to liberate it from all sides.
http://vanos-bmw.com/images/n52/005.jpg
http://vanos-bmw.com/images/n52/006.jpg
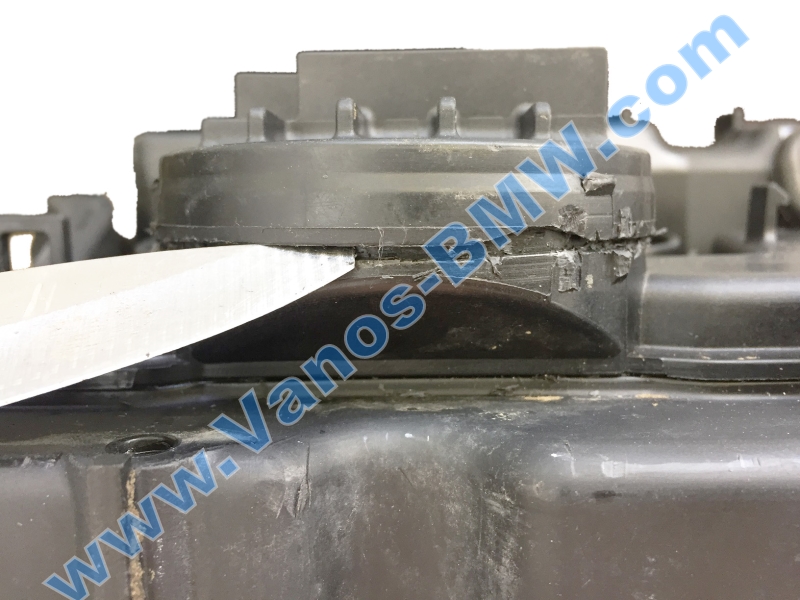
Gradually the lid begins to move away (use a knife, blunt side widening gap).
http://vanos-bmw.com/images/n52/007.jpg
http://vanos-bmw.com/images/n52/008.jpg
http://vanos-bmw.com/images/n52/009.jpg
It is important not to try to open the cover on one side only when it «goes» (as it is possible to break off part of the cover on the opposite side
where the adhesive is still robust.) Even if the cap is «gone» still need to continue to exempt it from all sides, gently widening the gap.
http://vanos-bmw.com/images/n52/010.jpg
http://vanos-bmw.com/images/n52/011.jpg
http://vanos-bmw.com/images/n52/012.jpg
http://vanos-bmw.com/images/n52/013.jpg
http://vanos-bmw.com/images/n52/014.jpg
http://vanos-bmw.com/images/n52/015.jpg
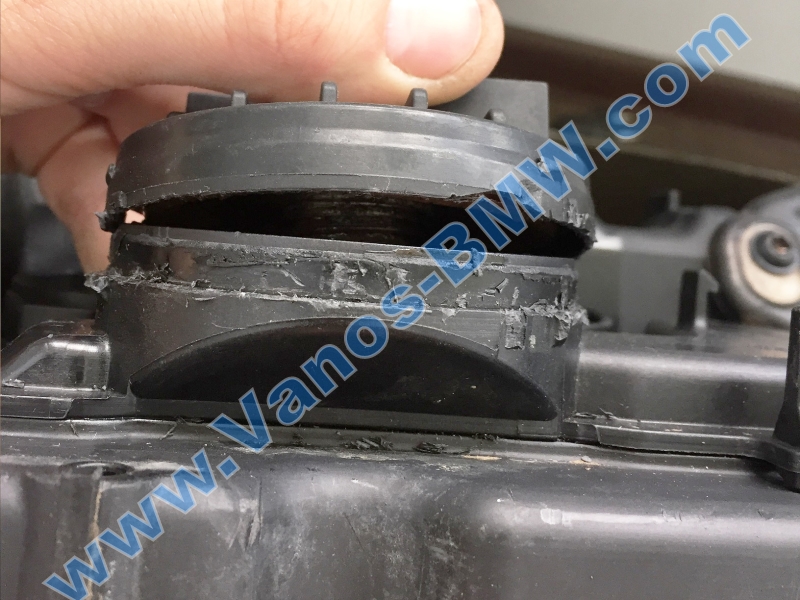
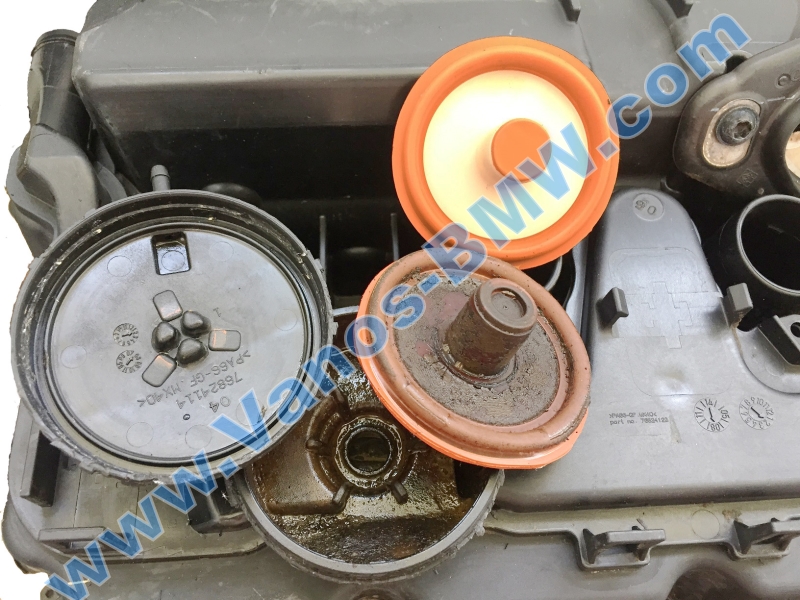
Once the lid is removed, you can wash the inside of the valve such as gasoline.
Clear the neck of the residual adhesive.
Then take the lid membrane need her to finish a little, need a little sawed or cut stationery knife the outer diameter of the projections on the lid
of the membrane to the new membrane sit as a full-time (because of the peculiarities of the production of our diaphragm, we can not make a hole on the back
of the same lot as the on the native membrane, but it is easy to solve finalizing the standard diaphragm cover).
http://vanos-bmw.com/images/n52/016.jpg
http://vanos-bmw.com/images/n52/017.jpg
http://vanos-bmw.com/images/n52/018.jpg
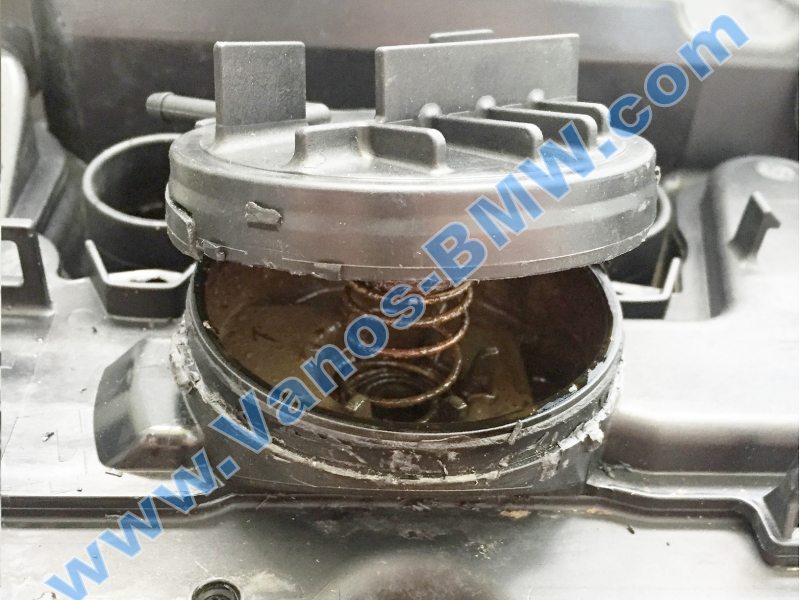
Then check that the membrane was getting into the cover as a native. Putting the valve back, set the spring, diaphragm and cover.
Before installing heat the ears that we was bent and bend them to the center. For peace of mind put on edge a little sealant and collect.
If, during disassembly of the retaining bracket broken, the lid can be glued back to the epoxy adhesive. On the edge of the cover
(the cover and the neck pre-wipe with acetone), worn on the neck and held her until the glue (do not forget to set into a spring and membrane :-)).
http://vanos-bmw.com/images/n52/020.jpg
Valve repair over.
During the first run, after replacing the diaphragm, the engine can not work steadily
(this is due to the fact that when the membrane was torn fuel cards retuned ECU, according to the testimony of the lambda probe, which recorded high
oxygen content). After replacing the valve membrane restores, and eliminated unaccounted suction air control unit needs some time to adjust fuel cards.
It should be allowed to run the engine for a while, switch off the ignition and start again, the engine must reach normal operation.

Z důvodu zachování autenticity ponechávám v angličtině, jazykově nepolíbení použijí "translator".
Membrane for cover N51, N52, N52N, N52K, N53 BMW 11127552281 ( 11127548196 ) — 1 pcs. — $28.90, savings of more than $450.
New diaphragm valve for crankcase ventilation. Producer sells only cover entirely. We produce membrane separately!
For replacement you need to remove the valve cover by prying it with a screwdriver. Be careful, remove the cover of the membrane slowly.
remove the old and install the new membrane. Close the cover.
Over time, the membrane crankcase ventilation valve mounted inside the valve cover N51, N52, N52N, N52K, N53 (valve is integrated in the motor)
11127552281, 11127548196 dries and breaks. Through the torn membrane into the engine gets unaccounted mass air flow sensor.
As a result, the engine can be difficult to start, unstable work (especially at idle), smoke may be misfiring, as the engine can get the dust,
which enhances the wear of parts and mechanisms.If the whistle is heard in the area of ??finding oil separator, then the membrane is torn.
The manufacturer sells only the valve cover assembly cost, which is about $ 500. We produce and sell this membrane separately.
Check the membrane is torn or not kvkg valve can be as follows:
It is necessary to put the tube on the breather valve and try to blow membrane (draw and exhale into a tube air),
if the membrane is torn the valve will be «purged» if the entire membrane valve will not be purged.
http://vanos-bmw.com/images/n52/002.jpg
Replacement instructions:
Remove the valve cover. (you can replace the lid not removed, but it is not very convenient).
Remove the cover of the membrane. (The cover is glued to the membrane plant in one or two places, but still cover can be removed).
http://vanos-bmw.com/images/n52/003.jpg
In order to remove the cover, take a small hammer and gently knock the cover membrane. (due to the nature of the adhesive after drying it is fragile,
brittle when rapping glue cracked and softer plastic is not).
http://vanos-bmw.com/images/n52/004.jpg
In order to remove the cover of the membrane without breaking the retaining clips, they need to heat the building hairdryer.
In the heated lid turn down the retaining bracket and between them and puts a lid membrane such as a toothpick.
http://vanos-bmw.com/images/n52/005+.jpg
Now, the cover can be removed, but we must remember that the cover is stuck in a circle.
Once again heated lid of the membrane and into the gap between the neck and the cover insert a flathead screwdriver, but do not break out the cover,
but simply trying to expand the gap a little (we put a screwdriver into the slot and hitting it with a hammer, it is convenient to use a screwdriver
instead of a dull knife sticking his plane) (clicks will be heard cracking glue). If the lid fell on one side akuratno we continue to liberate it from all sides.
http://vanos-bmw.com/images/n52/005.jpg
http://vanos-bmw.com/images/n52/006.jpg
Gradually the lid begins to move away (use a knife, blunt side widening gap).
http://vanos-bmw.com/images/n52/007.jpg
http://vanos-bmw.com/images/n52/008.jpg
http://vanos-bmw.com/images/n52/009.jpg
It is important not to try to open the cover on one side only when it «goes» (as it is possible to break off part of the cover on the opposite side
where the adhesive is still robust.) Even if the cap is «gone» still need to continue to exempt it from all sides, gently widening the gap.
http://vanos-bmw.com/images/n52/010.jpg
http://vanos-bmw.com/images/n52/011.jpg
http://vanos-bmw.com/images/n52/012.jpg
http://vanos-bmw.com/images/n52/013.jpg
http://vanos-bmw.com/images/n52/014.jpg
http://vanos-bmw.com/images/n52/015.jpg
Once the lid is removed, you can wash the inside of the valve such as gasoline.
Clear the neck of the residual adhesive.
Then take the lid membrane need her to finish a little, need a little sawed or cut stationery knife the outer diameter of the projections on the lid
of the membrane to the new membrane sit as a full-time (because of the peculiarities of the production of our diaphragm, we can not make a hole on the back
of the same lot as the on the native membrane, but it is easy to solve finalizing the standard diaphragm cover).
http://vanos-bmw.com/images/n52/016.jpg
http://vanos-bmw.com/images/n52/017.jpg
http://vanos-bmw.com/images/n52/018.jpg
Then check that the membrane was getting into the cover as a native. Putting the valve back, set the spring, diaphragm and cover.
Before installing heat the ears that we was bent and bend them to the center. For peace of mind put on edge a little sealant and collect.
If, during disassembly of the retaining bracket broken, the lid can be glued back to the epoxy adhesive. On the edge of the cover
(the cover and the neck pre-wipe with acetone), worn on the neck and held her until the glue (do not forget to set into a spring and membrane :-)).
http://vanos-bmw.com/images/n52/020.jpg
Valve repair over.
During the first run, after replacing the diaphragm, the engine can not work steadily
(this is due to the fact that when the membrane was torn fuel cards retuned ECU, according to the testimony of the lambda probe, which recorded high
oxygen content). After replacing the valve membrane restores, and eliminated unaccounted suction air control unit needs some time to adjust fuel cards.
It should be allowed to run the engine for a while, switch off the ignition and start again, the engine must reach normal operation.
Audi A3 30 gtron automat CNG
Octavia 1,5 TSI automat CNG Ex
Octavia 1,4 TSI manual CNG Ex
E60 530iA Ex
E39 530dA Ex
Octavia 1,5 TSI automat CNG Ex
Octavia 1,4 TSI manual CNG Ex
E60 530iA Ex
E39 530dA Ex
Kto je prítomný
Užívatelia prezerajúci toto fórum: Žiadny pripojení užívatelia a 15 neregistrovaných